Friday, November 5, 2010

The Chocolate Fairy

Everyone needs a chocolate fairy, right? I mean, in Pixie Hollow they have all kinds of fairies with all kinds of talents. I want to find a chocolate fairy. Well, so I made one. This was the doll I started when I first wanted to try making a Waldorf-style doll. She's far from perfect and I was in love with her so much at first, but now I feel like I'm supposed to save her for someone else. I just don't know WHO. So I finished sewing her dress tonight, brushed off the lint from her face, took a few photos, and put her in a plastic bag in my closet. I do love her, but I just have this weird feeling that she is meant for someone else. I guess when the time comes, I'll know, right?

She has little toes, a belly button, and a bum. Beautiful strands of yarn and embroidery floss for her hair, though it's acrylic, not wool. She was a good little experiment, and a great training piece. There's not a thing wrong with her, so she will be perfect for someone.

Is she meant for you?

Dolls of all kinds

I've been working and working around here ... busy as a bee whenever the girls let me sew. Miss E is generally very good, but little e is an impatient toddler who rarely sleeps. But I have dreams that began two years ago, just before I got pregnant with little e. Back in high school, my friends told me that my mom and I should sell our bears we made, but where? We made millions, but gave them all away or kept them. In the mid-80s, the options for selling were to sell to your friends (but why?) or find a small store to sell them for you. That was sounding too difficult, so we never bothered.

When I started making dolls a couple of years ago, again, my friends urged me to sell. I got all excited when I discovered Etsy, and a friend designed me a lovely logo and business cards. I reserved a name on Etsy and Gmail. And then I got so tired with a preschooler and being pregnant that I never got anything made. I also have millions of gifts I've made and want to make. And things for myself and my daughters. A baby didn't speed up the sewing, but ... now, she is beginning to play with big sis while I sew, and things are looking like I might be able to open my shop that I've so badly wanted to have up and running!

My goal is to have a shop open for Thanksgiving ... yay! I am working as much as possible on some dolls, finishing the biggest and first today. Hooray! She is absolutely gorgeous, and little e wants her. She hugged her and tried to run away with her, and it took a lot of convincing to get that doll back. Little e will get one, but not one that is so big and elaborate. For Christmas, she will get a smaller Waldorf doll. And hopefully I will have more dolls made to sell as well.

We made bats for Halloween, thanks to the Heather Bailey free tutorial. So very cute, and pretty quick to make, too. We named them Bette Boo and Becca Boo, and maybe next year, we'll actually make them from Halloween socks instead of the old argyle socks my mom bought me 15 years ago. Hmm ...

Today, though, on a whim, I learned how to do simple needle felting. I'm no expert by any means, but Miss E very much wanted a blessing fairy. There are gorgeous fairies on Etsy, made of wool roving, but I found a quick tutorial and grabbed the roving I have just received (a gift for Miss E, but don't anyone tell her) and the felting needle I ordered two years ago, and went to work. In about an hour, we had a cute fairy! Nothing too fancy like the ones I'd love to buy, but it also didn't cost more than a small amount, and that is fine for a four-and-a-half-year-old. She just wanted one to hug and play with. She treats things like this very well, but I still didn't feel she needed a $36 huggable fairy. Maybe someday *I* will buy one for myself -- they are gorgeous!

In the meantime, this was a very pretty fairy for a little girl who loves natural fibers and dolls.

And little e? She wanted the simple flannel pillow I made for her sis that is filled with flaxseed, buckwheat hulls and lavender buds, so I took the small amount of filling I had left and whipped up the same pillow in a smaller size. We love them because they can be thrown in the microwave to be warmed up. The lavender scent is heavenly and very calm and relaxing for bedtime. Little e was elated to have her own pillow!

And Mommy? Well, in between all the OTHER projects, I'm trying to make a flannel nightdress (my test on a new pattern -- use cheap flannel from JoAnn to try it out, end up with a new pajama tunic), then on to the real dress (the fabric is waiting patiently), and perhaps a skirt. Maybe someday that other shirt will be finished (it's half done), and the purse I started and nearly finished in February *might* just get finished up before Christmas.

I have big dreams ... For those of you who wondered how I've managed to keep a 15-month-old busy, see for yourself. It didn't take that long to pick up after she went down for a nap, but it sure did make her happy to have all those fabric scraps to play with!

Thursday, August 12, 2010

Girls love glamor

My 4-year-old has been pestering me for her mermaid princess dress for the last week or so since I came home with the fabric. I had hemmed and hawed over what to make her, and she has finally agreed to wear this for both an upcoming mermaid party and Halloween (or so she says today). Possibly for the fairies and unicorns party as well. She told me, though, that she didn't want the mermaid tail skirt because she was a mermaid who could come out of the water and look like a regular princess. Hmm. Okay, so scrap the pattern for the tail ... need glamorous princess gown instead. She did NOT like the idea of a tutu-style skirt over the tail. She wanted floor-length, drapey, and full-on glamor. I showed her several patterns, and nothing was clicking for either of us, but when she got her hands on the fabric and held it up, we started formulating a plan.

I have to admit that I *love* working with her. She has amazing ideas every day and I let her act on them as much as possible, fostering every bit of her creativity. She got me thinking, and one night, trying to get little miss e to sleep, I realized that I could use the bubble dress pattern to make this dress.

The bubble dress ... my new favorite go-to pattern, from a tutorial by Lex on her blog. She does some absolutely amazing fashions, and I am so impressed with the simplicity of this dress. I made five in two days, which sounds crazy, but it's true.

So I took Lex's idea and just made it strapless, per Miss E's instructions, adding a casing in the chest band for elastic. I used the basic fabric headband idea, stitching one end of the elastic to each end of the chest band, and making sure it was exactly the right size to stay up. The dress is a bit heavy because of the crushed velvet panne (yes, the cheap polyester stuff; this is a costume!). That's the underlayer, which is necessary because she needed something soft against her body, and because I didn't want a see-through dress. The top layer is from the special occasions fabric collection at JoAnn. I had another fabric in hand, and this one was at the cutting counter screaming "MERMAID" at me. It didn't let me down. I think they work together perfectly, leaving her with a flowing, absolutely beautiful gown.

The top band is from Amy Butler's Love collection, the fabric that is the inner lining on the purse/tote I started mid-February. No, it isn't finished yet. I keep interrupting myself and leaving it sitting, 75 percent done, in the back of my closet. However, the fabric for the mermaid princess dress was on the floor right in front of the purse, and I realized that they were almost the exact same color. I figured it would be nice to have a cotton around her chest, and it would be easier to work with than the slippery panne and nylon.

I think it took about two hours to finish, and with the serger, all the crazy stray threads were removed and anything that wasn't was made all nice and pretty and orderly. If she does decide it feels like it needs a strap, I think I would cover a big button with the bluer part of the Love fabric and put that right in the middle of the top. Then I'd serge the sides of a long piece of the sparkle fabric, put an elastic loop in the center, and use that as an optional halter. However, she wore the dress for at least two hours tonight after it was made, and she never once had it slip. Sounds like I got the elastic right! If she doesn't need the halter, I may make a big gauzy flower for the front center. I haven't decided, but I guess that is yet to be determined. For now, it's really a very striking dress and I can't believe I made it myself!

I'll include a couple other bubble dress photos here. Just such a great way to make a quick dress, and both girls look so cute in theirs, as does our neighbor, who got a matching one for little miss e's first birthday party. Miss E's American Girl Doll Bitty Baby got one, too! They all looked like a royal court in purple and chocolate.

The first one I made ended up being too short, really, but when paired with little brown leggings, it is just adorable on little miss e as she toddles around.

Have fun, and try out Lex's awesome tutorial!


Wednesday, August 11, 2010

Here she is!

My first Waldorf doll, and I love her! Meet Mandy. I gave Miss E a list of five names to choose from, and she wanted Mandy, like our former cat Mandy. She is madly in love with Mandy, too, and very glad that she is finally finished. So are my fingers and thumbs! Stitching on the hair was tedious and tough on the fingers and thumbs, but the doll needles are so amazingly cool for the task. I was using the 5-inch needle yesterday, but pulled out the 7-inch needle today and oh it was nice! I felt like some kind of strange surgeon sewing on her head like that, but the needles are fantastic and made it through.

I will say that I've learned a whole lot making my first, and now I can't wait to make more. I even ordered handspun, hand-dyed wool yarn today off Etsy and I'm so very excited to make doll hair with it! I also can't believe how much yarn you can use for hair! I used almost a full skein of 93 yards on Mandy!

I'm still waiting for the book I ordered more than a week and a half ago. I knew I should have just gotten it from Amazon and not from an Amazon seller who uses snails to deliver ... oh well. Live and learn. In the meantime, I used several tutorials to create the head, the hair, the body, the doll. Even found a great video tutorial from Leslie at Stitch Lab (via someone else's blog!) on how to properly do the ladder stitch so I could put the head on just right. That part alone has made me so happy. All these years of making dolls and bears, and I've never studied how a Waldorf doll was made. Now I see the light, and I've got a new favorite thing to make!

The supplies are expensive and the dolls are time-intensive, so now I see why they cost so much to buy. If I get good enough at it, I want to sell some, too. There are some amazing women out there making them and I can only hope to have something close to as beautiful as theirs.

Because I have a toddler screaming on my lap at the moment (the one who refuses to sleep. ever.), I'm cutting this short. I would like to publish my list of tutorials I used and the beautiful dolls I've found, but that isn't going to happen right now. I really did want to post photos of my doll, though!

Welcome, Mandy!

------------------------


The head, neck and arms sewn together.


The body sewn up! It took until this evening before I removed the safety pins and stitched her feet and legs. She has since borrowed a dress from Bitty Baby -- the one that matches Miss E's dress, of course. I will make her a dress of her own, very soon, and some dark purple panties. I just want to hug her -- she's so sweet!


The hair, the hair, the HAIR! It's a beautiful light brown with golden tones. Not an exact match to Miss E, but similar enough that she feels I "got it right". She has two layers of sewn-on hair. I used the "wig" method. I feel like I may need to open her shoulder and stuff more wool in to support her head more. The hair is kind of pulling her head back a bit!


Here she is, as close to being done as possible! She still needed the stitching on her feet and along her leg bends, but she was close to done at this point. I'd photograph her now, but she is being happily snuggled in a bed and I won't disturb that.

Saturday, August 7, 2010

My first and so adorable already!

Okay, so I am now officially obsessed with doll making. My Waldorf supplies got here on Thursday from Weir and I dug in last night and made my first doll head. Tonight, I finished it off and embroidered the face. I'm making her for Miss E, so she got special Miss E eyes -- a mix of gray and brown specs, plus a wide smile. I am in love already and I can't wait to put the rest of her together. I am constantly thinking about what to make next and how to do hair, dresses, toes, noses, eyes ... eek! But oh what fun!

I just had to share some photos of my first. Note, too, that my sewing table has been overtaken with doll supplies. (The white fleece bear is Miss E's latest project.)
Stay tuned for more!

p.s. There's no way I can keep this one until Christmas. I think I would burst! And Miss E would cry her beautiful eyes out!


Wednesday, August 4, 2010

Doll fun

I'm back to dolls again. I got hooked on Waldorf dolls last week and gave it a go to see if I could manage ... now I've got a bundle of supplies headed my way on a UPS truck and can't wait! (A book, too.) Here's a glimpse of my first, my little Chocolate Fairy. I haven't decided on a name for her, but she is beautiful. Her head is too skinny, I think, but I went with the materials I had at hand and have studied other tutorials now and see that I should have made it wider. So, I made up for it with ginormous amounts of crazy hair in a yarn I've been dying to use on a doll.

I started on a dress for her, but unfortunately ran out of olive felt ... and so did JoAnn. Yikes. So, that will happen at some point. I may instead try out another dress idea I have in mind.

In the meantime, I updated Jessie. She is all glammed out now with new layers of hair, and, at Miss E's insistence, a new face. I made her a dress, and though it looks really cute, the details on the straps and buttons are so incredibly lame that I look like a remedial sewist. Yikes. I haven't sewn a buttonhole for 25 years, and I need a lot of practice, it appears. Overall, though, Miss Jessie is very cute now!

Can't wait for those supplies to get here!!!

Thursday, July 15, 2010

Organic sewing

No, not organic cotton ... just pure, organic, patternless and somewhat seat-of-the-pants sewing. The kind I seem to excel at. One of these days, I will take a class to better my pattern-following skills. In the meantime, I will continue having fun!

So, my hubby had a bunch of t-shirts he was going to give to Goodwill, but I saved several to play with. I had intended to use them to make some doll t-shirts and pants. Instead, yesterday, I cut off the top half of one and serged the top edge with the brown thread that was loaded. Then, I smocked it, and today finished that and steamed it and tossed it in the dryer to shrink up the smocking.

Um. It was supposed to be a birthday gift for little e, who turns 1 next week. But ... it was only slightly big on Miss E, and after seeing it on her, I decided I'd be wasting too much to hack it up to fit little e, and besides, Miss E got so excited, it turned into her dress. I added brown ribbon straps and a really cool flower right in the middle, with a couple of her beads. I got the flower idea from the Made By Lex blog. She does some absolutely stunning refashions. I can only hope to be that good someday, but it has given me such inspiration! I will definitely be making more of these; they are way too fun and so simple.

Now that I've come up flat on a few different projects for little e, I think it's time to make that cute little tote bag that I know will turn out perfectly. She is just beginning to love putting things in and taking them out, so it should work as a perfect gift.

Friday, July 2, 2010

Inspiration

I keep talking about how I've been sewing up a storm lately, after another hiatus due to sleepless toddler, but I don't think I've really summarized or shown much.

Pants.


I made ruffle pants for Little Miss e's upcoming 1-year birthday. The ruffle pants are soooooo cute, especially in the tiny sizes! I have been using the Sandi Henderson ruffle pants pattern. Her patterns are incredibly easy to follow and highly detailed and I LOVE them. I was so excited because I think I made this pair in less than an hour and a half. Since it was so simple, I decided to branch out and make a boy version that would be long shorts that have a roll-up-hem option. I stayed up late last night to do this, giddy with excitement. They are adorable.

Now, the sad part.

UNFORTUNATELY, the size 12-18 month does NOT go over my fairly-skinny, 20th-percentile 11-month-old little girl. sigh. I just had my bubble burst. I will either give the beautiful owl pair away or sell them, and now need to make a MUCH larger size for this tiny girl, or else just make a top for her or dress with bloomers. So much for that birthday gift. I'm actually a bit stumped here b/c the waistband comes out about 4 or 5 inches smaller than the elastic length recommended for the same pair of pants. I followed the instructions and did appropriate seaming. Grr. So, there's barely any gathering, and I think they *might* still fit on a skinny newborn, so I'd say they are more like long pants for a newborn and definitely not going to work as capri pants (or long boy shorts).

Dress.


A couple of weeks ago, I found this simple sundress tut for girls. I made this for Miss E and she LOVES it so much that she barely took it off for the first eight days. No joke. I think I spent about 4 hours on that one; a one-day off-and-on sewing project. Made one for the doll to match in about an hour! I will definitely repeat this one. (She has requested one, and soon.)

Blouse.

I bought Lila Tueller's peasant top pattern for me and made one, with alterations, and have started another. Not the same full details and all as the Sandi patterns, but easy enough that I was able to make myself a shirt for the first time ever!

Aprons.


I also used an excellent Sewing for Dummies (yes, I can be a dummy!) apron pattern and realized it was the easiest ever. I enhanced it with an elastic neck strap so it can go off and on easily with no help, and added a pair of ruffles to fancy it up. I added an oven mitt, too, and learned that was pretty easy, too. I whipped up two of the aprons at the same time, one as a gift for a friend and one for Miss E (long-promised in the cute cat and calico flowers fabric). Miss E's has a cute flounce instead of ruffles because we couldn't bear to cover up the cats.

So, that's where I am. Having fun, as I can, and loving these quick-yet-satisfying projects, even the baby pants, though I'm still growling on that, having just come out of giddiness over them. Hope you are having as much fun as me!

Friday, June 25, 2010

Peanut baby


I was looking for inspiration today, not wanting to pick up any of the projects I have in process, and lo and behold ... a peanut baby. Miss E insisted on one, so in about 40 minutes, she had Peanut in her arms. So cute, so quick and simple. I still want to make another for Little Miss e for her 1-year birthday, which is in about a month. (*gasp*) I want to do the pouch, but Miss E didn't feel the need, so it sped things up a bit. It looks very simple, too, so next Peanut Baby will get a pocket to put her in and take her out -- a perfect activity for a toddler. The preschooler just wants dolls!

Check out the tutorial! Thank you to Trixi for such a cute project!

Now, if I can find time to blog about all the other exciting projects I've been able to whip out in the last few weeks ... Like the adorable and simple smocked sundress Miss E is wearing in that photo. A couple of adorable aprons (more to be made soon with the awesome retro kitchen print I just found on Etsy), a shirt for myself (finally) and more. I'm one of those crazy artistic sewers, according to Amy Karol ... yes, one project after the other, several at a time, and whatever whim I have. Hence the "Whim du Jour"!

Off to switch laundry before Little Miss e wakes from a good nap. (Finally sleeping. Yay.) Then off to make a yummy coconut rice with a Thai chicken mix, using the lovely Thai basil from our tiny garden.

Friday, May 28, 2010

Elephants and a new tiny doll

It's the end of May. I'm not sure where the time went, but Little e is 10 months old, and the school year just finished. YIKES! Miss E's preschool had a wonderful end-of-year party this morning, so I made gifts for the teachers. Actually, gifts for their children. You see, it's a very small school, in operation for just one year. It is perfect. The children, parents and teachers all get along so well and we have created this fantastic community, just the way it should be.

Miss E has grown very attached to her teachers. Each teacher has been bringing her baby to school since the fall, and the babies are now toddlers, walking around and over a year old. One teacher is moving away, going back to Louisiana with her family. Her older daughter is Miss E's age, and the two have gotten to know each other over the past nine months. At this age, or at least with Miss E, the concept of friends is not fully developed to the adult definition. My somewhat shy and often very reserved Miss E was very quick to correct me in the fall when I referred to a schoolmate as her "friend". She said, quoting me, "No, Mommy, I don't know her well enough yet to consider her my friend." Three months later, she tried to say the same thing, but I said that after several months, she should be able to tell me if that is a friend. What I came to understand was that because it's such a small number of children, they are all friends and all interact very well. Some are more outgoing than others. However, Miss E can tell me all kinds of cute stories about each one of them.

So Miss E's teacher and friend are moving away. A very difficult thing to truly understand, though Miss E can tell you all about it. I wanted to make something for them as a going away/thank you gift, and one night it finally came to me. (I have to have it all planned out in my head and it has to seem just right, or it just doesn't happen.) I'd just recently seen the uber-cute pattern from Heather Bailey for Effie & Ollie the elephants, and I knew I already had an elephant pattern in the "Toys to Sew" book I have. There's the saying of "you've got a memory like an elephant," and that stuck in my head. Elephants. Memories.

Later, I had the revelation that this would be the perfect time to use the Riley Blake fat quarter combo I purchased a few months back. If I cut a full elephant from each fat quarter (there are four fabrics), then I could mix them up so that each elephant had each of the four fabrics used on it, representing that each girl (my two and the two moving away) has given a piece of herself to the others. A lovely way to show that we will never forget their friendship and the wonderful year we've had, watching all four girls (and the rest of the school) grow and learn and develop.

I will admit that the pattern I had was far from optimal. Again, the book was disappointing in the instructions and pattern markings. There is way too much assumed and far too little detail written. Maybe I'm just spoiled by the designer patterns I'm becoming accustomed to, but it sure does help to know where to join up all these little tiny pieces, you know? The first elephant was very disappointing. We said it looked like a drunken pig with a stretched out snout. Sad. As I went along, though, I found ways to make the legs work better, and the end result was very cute, especially with all four elephants lined up together. Miss E and I named them (left to right in the photo above) Dotty, Flora, Ivy and Birdie. Dotty, the first one, went to Little e, who will just chew on her and not mind her gross imperfections. Ivy was Miss E's final choice. Flora and Birdie went to our friends.

After the second elephant, I ordered a copy of the Heather Bailey pattern. It looks far more detailed, and I can't wait to find the time to try it out ...

I also wanted to make a gift for the second teacher and her now-toddler daughter. With the leftover scraps of the fat quarters, I pieced together a little tiny toddler doll, also using all four fabrics. She got an orange flower for her hair, matching the elephant sisters. I sketched out all kinds of hair options, trying to recreate this adorable little girl that would be the recipient of the doll, and finally settled on a little hair flip that seemed to work. When I finally turned the doll right-side-out a couple of days later, I breathed a huge sigh of relief. She was perfect; exactly what I wanted for Little Miss B. Isn't she just adorable? (As adorable as Little Miss B ... almost!)

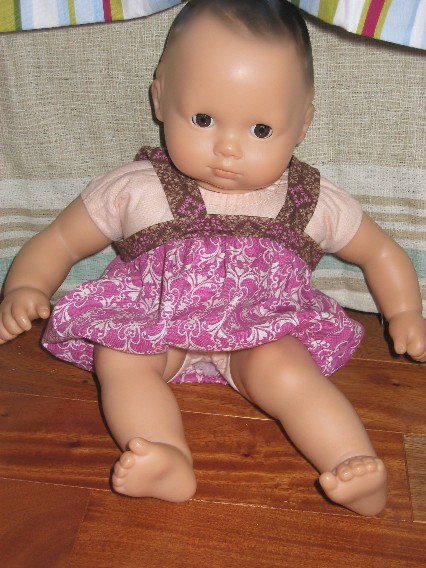
I photographed the new tiny doll with my Little e's doll from Christmas. Little e has put her mark on her doll, for sure! Hers shows lots of signs of wear, including some nice yellow spit-up stains. For months now, she has made me so happy ... her favorite toys for chewing on and sleeping with have been the ones I've made her; primarily this doll and the bird I made from the Spool Sewing tutorial. She knows how to make a mama smile!

As we wish our friends a fond farewell and best wishes for their move back to Louisiana, we hope that the elephants will get a whole lotta love ... and come back to visit their sister elephants in Austin many times!

Friday, April 9, 2010

For the girl who adores snails

Miss E is delighted that we suddenly have an abundance of snails living right here in our backyard. I swear they are the ones we picked up on rainy walks a few months back. But they appear to eat dirt and dead leaves, so as long as they are not destroying our plants, I'm fine with them moving in. Most likely they will do some good! I'm guilty of helping collect them anyway, so I best not complain.

For her birthday, we gave her three snail books, and I found the most adorable crocheted snail (named Leni) on Etsy. And about three weeks ago, I put together a cute snail t-shirt for her. The only thing I didn't get done was the sewing! Alas, the birthday passed and the unfinished shirt hung in my closet, begging for attention. Tonight, I finished it, so it's hanging in her room, waiting for her to wake and find it in the morning as a surprise.

It proves that snails *can* indeed be girly. The t-shirt is a very bright pink (from Target) and the fabrics are Sandi Henderson, like so many other items I've made. I still love those Ginger Blossom and Farmer's Market prints; so feminine and pink. As my first attempt at an applique, it's not too shabby -- just a bit of a pull on the shirt at the top of the snail shell. And if I hadn't included the two buttons for eyes at the end of the stalks, I would have been informed that my design was incomplete.

I'll leave you with a snail joke, from my niece, now told and retold by Miss E:
Q: What do you call a snail on a ship?
A: A snailor!

Tuesday, April 6, 2010

An enchanted birthday

We had a blast with Miss E's fourth birthday this year. It took more time and effort, but cost less and was definitely a hit with the kids and adults alike. I don't really know how it all got started, but one afternoon, I was brainstorming and we came up with the idea of gnomes as a party favor and it took off from there. I studied the Waldorf gnomes I found on the web, and looked at a couple tutorials, then ordered a ton of people turnings from Casey's Wood Products in Maine. Worked perfectly! I did them in batches and I would estimate that they took about 5-10 minutes apiece.


The next fun idea that came out of brainstorming with the family was to make gnome homes as a craft project, at the party. That way, the children would adopt a gnome, then build a home for him or her, and take both to their home. It was a blast! My husband sliced up a bunch of cardboard that we had in the garage, making nice little 5x7 inch bases (or roofs, you choose!). I bought a bunch of cheap craft sticks in two sizes and 10 bottles of craft glue. The rest, we collected. We took bags, boxes and egg cartons full of sticks, bark, acorns, grass trimmings, pine cones, snail shells and more. The imaginations ran wild, and we saw all kinds of beautiful gnome homes. I'll include a few images as examples, but every single one was awesome.


To top it off, we had chocolate cupcakes decorated with snails (of course), and hot pink toadstool cupcakes that were strawberry. How the heck do we top this next year?

Friday, April 2, 2010

Happy Easter weekend!


I'll catch up someday, but here's a quickie if you're running late on Easter gift ideas. Grab a toilet paper tube, some felt, and some craft glue. Cut two ears, two arms, circles for eyes, and some big feet from felt. Glue onto tube. Add a pompom tail, and voila! -- an Easter bunny gift holder. Fill it with jelly beans, socks, or anything else that's small and fits into a tp tube!

I have to admit, this was E's idea ... and she did most of the gluing together. I think it took us all of 10 minutes to make, and she just plain loves it. If I ever have the time someday (IF!), I could do a tutorial, but I know that the rest of you can duplicate this pretty easily yourselves.

Have a happy Easter!

Thursday, February 4, 2010

Enter Henri, the ginormous French garden snail

So it's been raining a lot around here. Most snails are still in hibernation, since it's a bit chilly for their taste. I happen to have a daughter who is quite enamored with snails, and it's driving her nuts. "When will the snails come back, Mommy? I can't WAIT." What am I to do? I can't change nature, can I? But I can sew ...

Enter Henri, the ginormous French garden snail. I felt like I was back in seventh grade home ec class, making "soft sculptures". Back then, I made a big stuffed clock, with poseable arms. Yesterday, it was a giant snail. (Funny, but there are a couple of other crazies like me who have snails on Etsy, and most of them came up with the same ideas I did!) I happened to have some knit fabric with, of all things, snails on it, and that worked for the big tube that became the shell. I went with fleece for the body, so I could sew the bottom to look like his big snaily foot, and not worry about frayed fabric. So his eye stalks are a big droopy, and no, I didn't make the feeler stalks yet, though both DH and daughter have said I need to add those. Maybe later on ... for now, though, Henri is happily hanging out in the house, where it is warm enough for his taste. His size? Well, he can be seen here with our 14.5-pound cat ... I think that says it all!

Henri crept into Miss E's room late last night, ready to surprise her this morning, and has been leaving his slime trails around the house all morning. He claims he loves French food, cooks better than Julia Child, and *should* have a mustache.

Sunday, January 31, 2010

Yummy felt foods

Sorry to leave y'all hanging, but now that the birthday girl has opened her present, I can show you how those tomatoes turned out and what they are for. I have been wanting to make a sandwich for a year now and found this fantastic tutorial from Tania's Myrtle & Eunice blog (tut is on her sidebar). Hers are beautiful, as is her photography. The tut is perfect, and though mine were not as lovely, they were fun to make and came out well. I just love the lettuce! Oh, and I added a burger and will eventually make some lunch meat as well since Miss E requested it.

To add to the fun, the sandwich inspired me to make s'mores. My daughter was only mildly impressed with the results, and then I realized ... d'oh! She's never HAD the real thing! My description only got her halfway to understanding, so I emailed the DH, who stopped at the store on the way home and bought supplies. After dinner, we fired the grill back up and showed her (as best as you can with a propane grill on the back patio) how real s'mores are made and ... better yet ... how they taste! She was instantly smitten and has enjoyed the felt ones much more since then!

And finally, I loved this idea I saw others making, and whipped up two, one for my daughter and one for the birthday girl: roll, cut and frost cookies! So simple and so cute; I need to have some small rolling pins and cookies cutters on hand for the next gift because these are truly fun. Both girls, mine almost 4 and the birthday girl just turned 3, knew exactly what to do and immediately had fun making their own decorated sugar cookies. What a blast! (I realize these are the plain cookies; perhaps better photos to come later on.) I boxed them up in cute bakery boxes. :)

That's probably it for the felt for awhile, but I do have a birthday cake to finish before Miss E turns FOUR. I started it a year ago and must finish it this time!

Enjoy!

Friday, January 22, 2010

Deceptively difficult!

Whoever thought that sewing up a few slices of tomato would be so challenging! I can't tell you what I'm working on, since it's a gift for a small friend (whose mom just might read this!), but the rest of the project has been pretty simple. But ... nice, perfect slices of tomato with neatly-stitched segments? Not so simple! My straight stitching is far from pretty, so I'm struggling through, and to make it more challenging, I have a 3.75-year-old who keeps bouncing up on the loveseat to see what I'm doing. Or, she asks me to thread her needle, tie a knot, trace out circles and hearts on felt ... because, in and around *my* projects, she has her own. Yesterday, she took off with the felt food making (wonder why?) and produced five sandwich cookies, a tomato slice, two blueberries, and a big strawberry donut. I think she has done great for a small fry!

Now, back to stitching and no more bitching ...

Wednesday, January 13, 2010

Doll clothes

I've been meaning to make doll clothes for Miss E's Bitty Baby for ... uh ... ahem ... well, let's just say a long time. The patterns are going to decay soon. Okay, so not that long, but a long time. I finally did, and they actually came out near-perfect! I am so very lousy at following patterns that this is a major accomplishment. Just a few hours of work, no swearing at all, and doll clothes that are so cute. The dress is really supposed to be a nightgown, but why would you just sleep in something so ornate?! It's a Simplicity pattern, 3517, view B.

The hat was a loose rendition of this tutorial from the purl bee, but made it reversible. It's at 80 percent of the pattern size, but I think next time, I'd make the brim much wider. It seems really skinny to me, but Miss E thought it was just perfect.

Best of all, the dress and hat coordinate with the dress I made last fall for Miss E, from one of the Portabello Pixie patterns from Sandi Henderson. That pattern just rocks -- I've made two dresses (her princess dresses, she calls them), extending the skirt length a bit to make them floor length (which won't last long at her growth rate), and also made a cute Santa shirt from it. Again, a pattern that I don't swear at and can get through in about 3.5-4.0 hours. YAY!

Just letting you know I'm here. And still making things. If you're reading me.