Saturday, April 16, 2011

The Esty site is live!

plushalicious is in business!
http://plushalicious.etsy.com/

YAY! Yes, I finally got my Etsy site up and running the other night, and made my first sale to a stranger! Woot! Thank you, mammalove, for buying my sweet little Bunny Love in Blue!

Bunny Love in Pink:
http://www.etsy.com/listing/72193450/bunny-love-in-pink

Here's my doll:
http://www.etsy.com/listing/72196744/chocolate-plum-waldorf-doll-15-inch

I'm starting small, but three items is better than none. Maybe someone will decide to buy my beautiful Waldorf doll. Little Miss e will be sad, and so will I in a way, since I've gotten used to having her smiling at me all day and night. She really is beautiful. But I know I will make plenty more, and I need to first finish the wig for Little e's doll, who has also been laying on the table for months now. Before she turns 2 this summer, that's the goal. Only a couple more hours of hand-stitching the hair and she is finished ... plus some clothes!

But good times ... too many things in progress right now, and never enough time to get it all done. But I did make two beautiful little fairies for Miss E's dollhouse for her birthday. She loves them. I'll post those soon. And she got two handmade by mama shirts and a skirt. Second skirt is in the closet, half done. Little e has a dress that is 75% done.

Most importantly, I finally finished the purse for me that was sitting abandoned in the back of the closet for a year and a month. It took a whopping 1.25 hours to finish. Isn't that sad!?! It's gorgeous. I need to post photos, don't I? But now, no time ...

Happy sewing to y'all! And a happy and gorgeous weekend! :)

-------- Added some for-sale photos on August 26 -------------


Wednesday, February 9, 2011

To dye for

A year or more ago, I took our stained and tired white table napkins and turned them a beautiful, deep espresso color. I mistakenly bleached them the next week, so they were a nice light shade of coffee au lait for a long time after that. I re-dyed them at some point, but they were becoming tired again and I was ready for a change.

The girls were thrilled today to find that we now have viciously violet napkins and flour sack towels.

Last week, I tried RIT dye in "purple". Blah at best. It barely covered the brown, making just slightly purplish and barely any darker. I don't know what went wrong; I followed their package instructions as closely as possible. I only used one package of dye, but I didn't think that would matter for the fairly small amount of fabric I had.

Today, I went back to my trusty iDye packets, making sure I used two just in case, and sure enough, I've got a seriously intense purple. Yahoo! I don't know the difference in the two brands, and though my sister has great luck with RIT, I'm sticking with iDye.

I should take a photo, but the girls are interrupting again ...

Sunday, February 6, 2011

Retro cooking

I've been doing so much in the kitchen again; not just the normal everyday cooking, but plenty of new, fun things. Today was no exception. As I was falling asleep last night (or attempting to), I was trying to come up with a good Sunday breakfast for the whole family, and finally decided on an old favorite that I hadn't made for years.

This morning, I dug out the recipe card, from a collection by McCall's magazine, dated 1973. This lovely collection, packaged by category and sitting in its original plastic box, was from my grandma's best friend Bea. When Bea passed away, my mom and I inherited many things, including this recipe collection. It always intrigued me. I was probably in junior high, and would sit in front of the box, reading all the gourmet meal suggestions, wondering what I could cook. For some reason, though, I never did cook with my dad. I baked, though, from as early as I can remember, both with my mom and by myself. I remember making this "elaborate" omelet in high school and feeling very fancy. The recipe card suggests it as part of a "Children's Sunday Supper" -- the omelet, whipped cream or ice cream, and hot cocoa. Ah yes, the 1973 version of healthy children's meals?

Once I graduated college and moved to Austin, the recipe collection was something I asked my mom to bring down to me on one of their trips. It sits up on a high cupboard shelf, rarely used, but greatly loved.

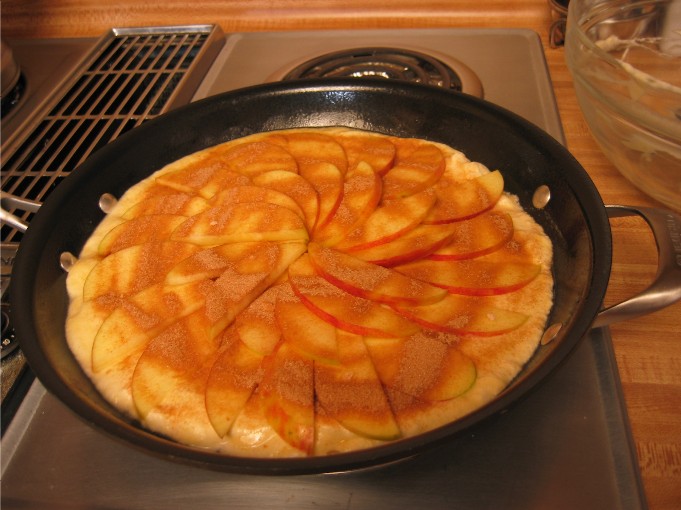
I altered the original recipe, doubling the amount of ingredients (except for sugar -- I cut that way back!), added toasted almonds sprinkled on top, and we declared it a hit. It's more of a pancake omelet; a little springier, not fully egg-ish. Spongy, but dry without being too dry. A little difficult to explain, but if you try it, you'll understand!

Here is my version of the retro recipe.

Fresh Apple Omelet
6 T. flour
1/2 t. baking powder
1/2 t. salt
4 eggs, separated
scant 2 T. sugar (based on personal taste)
6 T. milk
2 T. lemon juice
1 large unpared apple, thinly sliced

topping: 2 T. sugar mixed with 1/2 t. cinnamon

- Preheat oven to 375 degrees.
- Mix flour, baking powder and salt in large bowl.
- In medium bowl, beat egg whites until foamy. Gradually beat in sugar until stiff peaks form. (I love that the original recipe calls for a rotary beater!)
- In measuring cup or small bowl, beat egg yolks with milk and lemon juice.
- Mix milk mixture into flour mixture in large bowl.
- With spatula or wire whisk, gently fold egg whites into milk and flour batter just until combined.
- Slowly heat a large ovenproof skillet and melt enough butter in it to coat bottom and sides evenly.
- Turn batter into skillet, spreading evenly.
- Arrange apple slices in pattern over the top and sprinkle with cinnamon sugar mixture.
- Bake about 10-12 minutes or until top is glazed.
- Serve warm, cut into wedges.

We sprinkled toasted almonds on top, but agreed that walnuts would work well, too. Perhaps next time, we will chop some nuts and mix into the batter before baking. Perhaps add the nuts on top for baking ... Nevertheless, very tasty, and could be rounded out for a nice brunch with a slice of whole wheat toast and additional fresh fruit.

Enjoy!


Thursday, January 20, 2011

Fixations


Every time I get fixated on something new, Miss E follows suit. Case in point: clothespins and laundry. Lots of laundry being done around here, and to entertain the girls the other day, I strung up some yarn around the room and let them play with the mini clothespins Miss E got from Santa. We pulled out some big ones I'd stashed away, too, but they are all so ... cheap ... and the clips were breaking. What's a mom to do? Why, get Googling, of course!

I found new clothespins for sale. The cool, wooden kind like we used to use to hang laundry when I was growing up. But ... when you can find vintage clothespins for the same price or less, well, you buy them. Our 140 pins were delivered today, and Miss E immediately dumped the box on the bedroom floor and started in.

I also have seen many people selling vintage ribbon and trim on old clothespins, wound up to look like dolls. Yes, simple and oh-so-sweet. What a great way to organize all my loose ribbons and trim!

Miss E grabbed the ribbons and trim that she got from YaYa for Christmas (my mom was destashing!), quickly wrapped up some "girls" and is still playing happily with all six of them.

So beautiful, aren't they?

Friday, November 5, 2010

The Chocolate Fairy

Everyone needs a chocolate fairy, right? I mean, in Pixie Hollow they have all kinds of fairies with all kinds of talents. I want to find a chocolate fairy. Well, so I made one. This was the doll I started when I first wanted to try making a Waldorf-style doll. She's far from perfect and I was in love with her so much at first, but now I feel like I'm supposed to save her for someone else. I just don't know WHO. So I finished sewing her dress tonight, brushed off the lint from her face, took a few photos, and put her in a plastic bag in my closet. I do love her, but I just have this weird feeling that she is meant for someone else. I guess when the time comes, I'll know, right?

She has little toes, a belly button, and a bum. Beautiful strands of yarn and embroidery floss for her hair, though it's acrylic, not wool. She was a good little experiment, and a great training piece. There's not a thing wrong with her, so she will be perfect for someone.

Is she meant for you?

Dolls of all kinds

I've been working and working around here ... busy as a bee whenever the girls let me sew. Miss E is generally very good, but little e is an impatient toddler who rarely sleeps. But I have dreams that began two years ago, just before I got pregnant with little e. Back in high school, my friends told me that my mom and I should sell our bears we made, but where? We made millions, but gave them all away or kept them. In the mid-80s, the options for selling were to sell to your friends (but why?) or find a small store to sell them for you. That was sounding too difficult, so we never bothered.

When I started making dolls a couple of years ago, again, my friends urged me to sell. I got all excited when I discovered Etsy, and a friend designed me a lovely logo and business cards. I reserved a name on Etsy and Gmail. And then I got so tired with a preschooler and being pregnant that I never got anything made. I also have millions of gifts I've made and want to make. And things for myself and my daughters. A baby didn't speed up the sewing, but ... now, she is beginning to play with big sis while I sew, and things are looking like I might be able to open my shop that I've so badly wanted to have up and running!

My goal is to have a shop open for Thanksgiving ... yay! I am working as much as possible on some dolls, finishing the biggest and first today. Hooray! She is absolutely gorgeous, and little e wants her. She hugged her and tried to run away with her, and it took a lot of convincing to get that doll back. Little e will get one, but not one that is so big and elaborate. For Christmas, she will get a smaller Waldorf doll. And hopefully I will have more dolls made to sell as well.

We made bats for Halloween, thanks to the Heather Bailey free tutorial. So very cute, and pretty quick to make, too. We named them Bette Boo and Becca Boo, and maybe next year, we'll actually make them from Halloween socks instead of the old argyle socks my mom bought me 15 years ago. Hmm ...

Today, though, on a whim, I learned how to do simple needle felting. I'm no expert by any means, but Miss E very much wanted a blessing fairy. There are gorgeous fairies on Etsy, made of wool roving, but I found a quick tutorial and grabbed the roving I have just received (a gift for Miss E, but don't anyone tell her) and the felting needle I ordered two years ago, and went to work. In about an hour, we had a cute fairy! Nothing too fancy like the ones I'd love to buy, but it also didn't cost more than a small amount, and that is fine for a four-and-a-half-year-old. She just wanted one to hug and play with. She treats things like this very well, but I still didn't feel she needed a $36 huggable fairy. Maybe someday *I* will buy one for myself -- they are gorgeous!

In the meantime, this was a very pretty fairy for a little girl who loves natural fibers and dolls.

And little e? She wanted the simple flannel pillow I made for her sis that is filled with flaxseed, buckwheat hulls and lavender buds, so I took the small amount of filling I had left and whipped up the same pillow in a smaller size. We love them because they can be thrown in the microwave to be warmed up. The lavender scent is heavenly and very calm and relaxing for bedtime. Little e was elated to have her own pillow!

And Mommy? Well, in between all the OTHER projects, I'm trying to make a flannel nightdress (my test on a new pattern -- use cheap flannel from JoAnn to try it out, end up with a new pajama tunic), then on to the real dress (the fabric is waiting patiently), and perhaps a skirt. Maybe someday that other shirt will be finished (it's half done), and the purse I started and nearly finished in February *might* just get finished up before Christmas.

I have big dreams ... For those of you who wondered how I've managed to keep a 15-month-old busy, see for yourself. It didn't take that long to pick up after she went down for a nap, but it sure did make her happy to have all those fabric scraps to play with!

Thursday, August 12, 2010

Girls love glamor

My 4-year-old has been pestering me for her mermaid princess dress for the last week or so since I came home with the fabric. I had hemmed and hawed over what to make her, and she has finally agreed to wear this for both an upcoming mermaid party and Halloween (or so she says today). Possibly for the fairies and unicorns party as well. She told me, though, that she didn't want the mermaid tail skirt because she was a mermaid who could come out of the water and look like a regular princess. Hmm. Okay, so scrap the pattern for the tail ... need glamorous princess gown instead. She did NOT like the idea of a tutu-style skirt over the tail. She wanted floor-length, drapey, and full-on glamor. I showed her several patterns, and nothing was clicking for either of us, but when she got her hands on the fabric and held it up, we started formulating a plan.

I have to admit that I *love* working with her. She has amazing ideas every day and I let her act on them as much as possible, fostering every bit of her creativity. She got me thinking, and one night, trying to get little miss e to sleep, I realized that I could use the bubble dress pattern to make this dress.

The bubble dress ... my new favorite go-to pattern, from a tutorial by Lex on her blog. She does some absolutely amazing fashions, and I am so impressed with the simplicity of this dress. I made five in two days, which sounds crazy, but it's true.

So I took Lex's idea and just made it strapless, per Miss E's instructions, adding a casing in the chest band for elastic. I used the basic fabric headband idea, stitching one end of the elastic to each end of the chest band, and making sure it was exactly the right size to stay up. The dress is a bit heavy because of the crushed velvet panne (yes, the cheap polyester stuff; this is a costume!). That's the underlayer, which is necessary because she needed something soft against her body, and because I didn't want a see-through dress. The top layer is from the special occasions fabric collection at JoAnn. I had another fabric in hand, and this one was at the cutting counter screaming "MERMAID" at me. It didn't let me down. I think they work together perfectly, leaving her with a flowing, absolutely beautiful gown.

The top band is from Amy Butler's Love collection, the fabric that is the inner lining on the purse/tote I started mid-February. No, it isn't finished yet. I keep interrupting myself and leaving it sitting, 75 percent done, in the back of my closet. However, the fabric for the mermaid princess dress was on the floor right in front of the purse, and I realized that they were almost the exact same color. I figured it would be nice to have a cotton around her chest, and it would be easier to work with than the slippery panne and nylon.

I think it took about two hours to finish, and with the serger, all the crazy stray threads were removed and anything that wasn't was made all nice and pretty and orderly. If she does decide it feels like it needs a strap, I think I would cover a big button with the bluer part of the Love fabric and put that right in the middle of the top. Then I'd serge the sides of a long piece of the sparkle fabric, put an elastic loop in the center, and use that as an optional halter. However, she wore the dress for at least two hours tonight after it was made, and she never once had it slip. Sounds like I got the elastic right! If she doesn't need the halter, I may make a big gauzy flower for the front center. I haven't decided, but I guess that is yet to be determined. For now, it's really a very striking dress and I can't believe I made it myself!

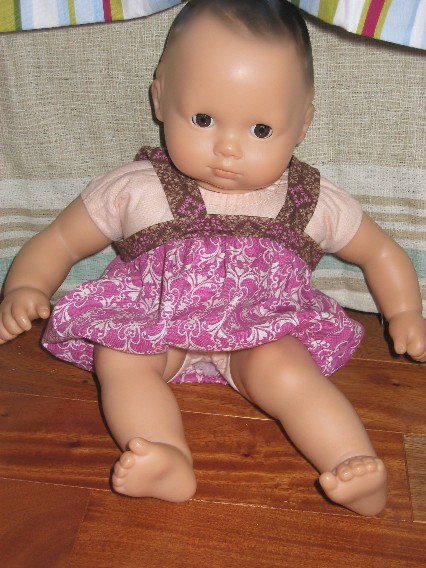
I'll include a couple other bubble dress photos here. Just such a great way to make a quick dress, and both girls look so cute in theirs, as does our neighbor, who got a matching one for little miss e's first birthday party. Miss E's American Girl Doll Bitty Baby got one, too! They all looked like a royal court in purple and chocolate.

The first one I made ended up being too short, really, but when paired with little brown leggings, it is just adorable on little miss e as she toddles around.

Have fun, and try out Lex's awesome tutorial!